For years we cut and baled our hay by hand, without the help of a tractor or machinery. If you have grass, you can make hay. You can store it loose or use a DIY hay baler to turn it into hay bales.
How to bale hay by hand
Table of Contents
- Introduction
- Alternatives to baling hay by hand
- Custom baling
- Baling on shares
- So we learned how to bale hay by hand
- Why bale your own hay?
- We built a hand hay baler
- How to cut hay by hand
- How to bale hay by hand
- Tips for using the hand baler
- Baling twine or baling wire
- Set up the DIY hay baler
- Fill the baler with hay
- How big are handmade bales?
- Additional photos of the hand baler
- Resources
Introduction
Why would we spend the time and effort to bale our own hay by hand, when we could buy a tractor and haying equipment?
Well, if you've priced haying equipment recently, you know the answer to that question. The price is astronomical.
And if you only have a few acres, or just a few animals to feed, it isn't worth the money we'd have to shell out to buy that machinery
Alternatives to baling hay by hand
If you're not up to cutting and baling your own hay by hand, but you can't afford a tractor and baler, there are a few alternatives you can explore.
Custom baling
In "custom baling" a farmer comes with his tractor and haying equipment to cut and bale the hay on your property.
The farmer usually charges a set amount per bale. You are responsible for picking up the hay bales in the field, transporting the hay bales to your barn, and unloading it from your trailer into your barn.
Custom baling is cheaper than buying your own haying equipment, but most ranchers who do custom baling have a minimum number of acres they'll cut for you. Our acreage isn't large enough for them to bother with.
Baling on shares
Sometimes a farmer will bale your hayfield "on shares." He'll take a percentage of the finished bales as his fee. At the time of writing this article, that percentage is commonly 40%, although I've been quoted as high as 50%.
So we learned how to bale hay by hand
So, we did the next best thing: we learned how to do it ourselves. Without a tractor, and without a mechanical baler.
Yes, it's labor intensive. And while we no longer do this - we are many years older now, and hubby ("the Chief") has health issues - we did it ourselves for many years.

Why bale your own hay?
Do you have to bale hay, or can you leave it loose?
We started out storing our hay loose in several sheds and anywhere else we could find a few square feet of dry storage space.
Those sheds were old though - we inherited them in various stages of disrepair when we bought our property. Many of the roofs had a hole or two... and over time the holes increased in size and number.
Eventually we tore the sheds down, one by one, for safety's sake. Which meant we had less space to store hay.
Forming hay into bales saves space. We could store much more of our hand-baled hay in the same amount of space vs. storing it loose.
We built a hand hay baler
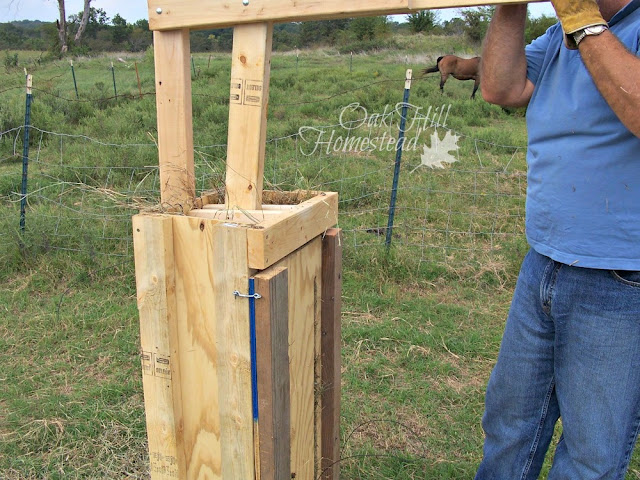
Eventually we built a DIY hand baler. Using a hand baler doesn't really save on labor or time, but it did make our hay easier to store, and we needed to be able to store it in less space.
A friend sent us a link to these homemade hay baler plans and the Chief set to work on it. The baler in the plans is used to make a bale of pine straw, but it works just fine to bale our mixed-grass hay.
We are, however, the first to admit that the plans are rather vague. We didn't write them!
Fortunately the Chief is a handy guy with a lot of building experience and he figured it out. He has a few tips for you further down in this article.
Even without a hand baler you can cut and store your own loose hay. You'll just need more space to store it.
How to cut hay by hand
Our hay field is about 10 acres. It was impossible to cut, rake and bale it all in just a few days or even a week since we were working by hand, without a tractor.
We worked on it a little at a time. It took us most of the summer to get completely around the field.
Is this ideal? No, we'd have better quality hay if we could get it done all at once, when the grass is at its peak. If you have enough help and maybe less acreage, you might be able to finish it up more quickly than we could.
The Chief cut the grass hay with our DR brush-mower, and later with a Troy and then with whatever brand we happened to have. We've gone through a few of these mowers over the years!
If you don't have a brush mower, you can use a sickle or a hand scythe to cut the hay. A lawnmower won't work though, it chops the grass up into pieces that are too small for hay.
Once the grass is dry - which takes about one day in our hot Oklahoma summers - I use a fan rake to rake it up in windrows, and to turn it over the following day to make sure it's completely dry.
How to bale hay by hand
Is it necessary to bale this hand-cut hay? No, of course not. You can store loose hay in a dry place. It won't lose any nutritional value if it isn't baled - or gain any additional nutritional value if it's baled.
The major drawback to storing it loose is that it takes up a lot more space. Baling hay compresses it so it requires less space, and bales can be stacked more efficiently than a pile of loose hay.
Making hay bales, whether using a DIY hay baler or by machine, is simply a matter of saving space and convenience. It doesn't extend the longevity of the hay, or increase the nutritional value in any way.
Tips for using the hand baler
So we (or rather, the Chief) built this hand baler using these [rather vague] plans. Again, I apologize for how vague the plans are, but we did not write them.
(Occasionally the link to the plans is broken, when websites are moved, reorganized, or shut down. Again, I have no control over that. But I'd appreciate it if you'd email me and let me know, so I can search the internet and see if I can find the plans somewhere else.)
Baling twine or baling wire
The hand baler plans suggest using baling twine, which is much faster to set up than the baling wire we used.
We bought a box of twine, opting for the lighter gauge because it was cheaper and our bales were smaller than the usual commercial bales, so we thought we wouldn't need the heavier twine.
The lighter-gauge twine we bought often broke when pulled tight around our hand-made bales. The heavier twine would have worked better.
Instead, we ended up using baling wire to wrap the bales because we had two rolls of it in the garage, left by the former property owner.
Set up the DIY hay baler
On the back of the baler are two small nails, one on each side of the board that holds the plunger. The plans call for cup hooks instead of the nails, but that's what we had on hand and they work fine.
Tie a loop in the twine and attach it to one of the nails on the back - or make a small circle or loop in the baling wire and slip it over the nail or cup hook.
Repeat for another length of twine or wire and attach to the nail or cup hook on the other side of the plunger.
Run these two lengths of twine or wire over the top of the baler and down into the interior.

On the inside bottom of the baler, there are two eye hooks, one on each side of the bottom, where the wires or twine go around the bale.
Inside the baler, the baling twine or wire is run between the eye on the bottom of the baler and the wooden board next to it, just to hold it in place.
The twine or wire doesn't go through the eye, but instead it is in the space between the eye hook and the board. This might sound confusing, but trust me, it's brilliant!
Once you finish tying up the bale, the wire/twine slips out when you remove the bale. This is why you don't run the wire or twine through the eye hook; it wouldn't slip out.
It's quite ingenious - just run it between the eye and the board.
So, first you string those two wires or twine pieces from the nails in back, over the back of the baler and into the interior, then between the eyes and the board.
Then the door of the baler is shut - held closed with a hook and eye at the top and another set at the bottom - and the bottom ends of the twine or wire are fed out through the slits in the door.
You're ready to make your first bale of hay!
Fill the baler with hay
With the door closed, hay is added through the opening in the top. When full, the plunger (also called a "hay press") is used to pack down the hay, then more is added, plunging after each addition.
Finally, the end of the wire or twine is removed from the little nails on the back and pulled over the top of the hay, then out through the slits in the front of the door.
Push the plunger down again to compress the hay and tie the bale up tightly using the two ends of the twine or wire.
Release the plunger, open the door, and remove the bale of hay. It will slip right out if you set up the baling twine or wire correctly.
How big are handmade bales?
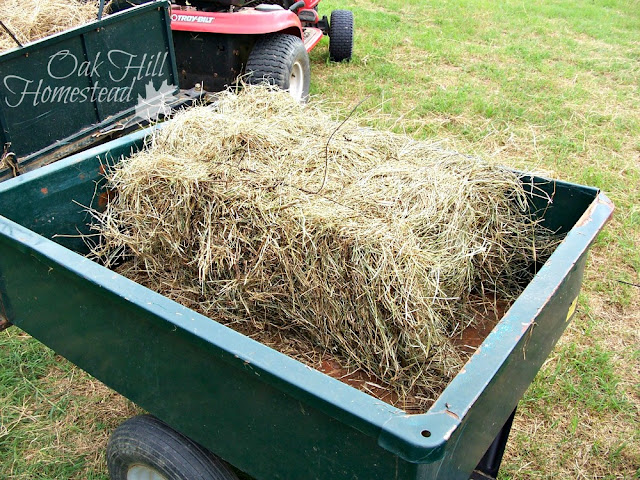
My best guess is that they are about one-third to half the size of a regular small square bale. They're not compressed as tightly as a commercial bale, so they aren't exactly equivalent.
Yes, they are smaller than commercial square bales, but they take up much less space than loose hay and they are easy to carry and feed to your livestock.
We baled enough of our hand-cut mixed-grass hay from our 10-acre field to feed our small herd of dairy goats and two horses over the winter.
Your yield will vary depending on the size of your field, the type of grass you grow, and the amount of rainfall in your area.
Additional photos of the hand baler
These photos were taken about a year after making the baler, and you can see that the wood has weathered. I suggest storing the baler out of the weather - or painting it - so it will last longer.
This image (above) of the hand hay baler from the side and back shows the nail on the back of the baler (to tie the twine on) and the hook and eye on the right that holds the door shut while you compress the hay with the plunger.
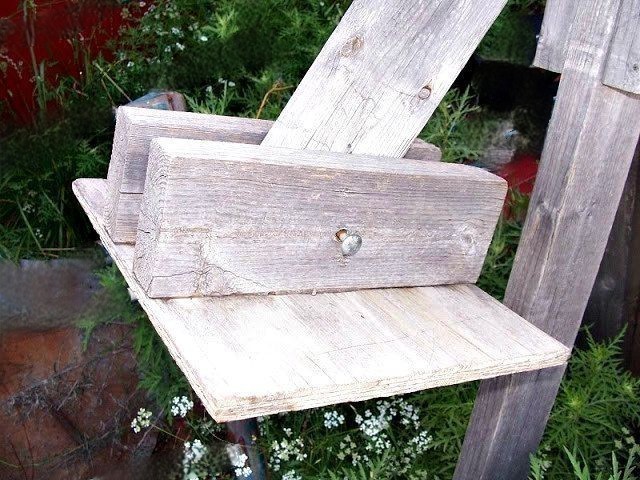
This second image shows the plunger at rest when the top of the baler is open so you can add hay.
Note that the bolt holding the plunger on the baler is not tightened, so that the plunger can swivel as needed when opening/shutting and when compressing the hay inside.
Another image of the plunger, at rest upside-down. Again, this shows that the bolt holding the plunging surface isn't tight.
My husband hopes that these photos are helpful. If you have any questions you are welcome to email him.
Unfortunately there are no step-by-step directions included with the plans for building the baler. We did not develop the plans or write those vague directions that come with the plan. This post is intended to give you some tips we've discovered that we hope are helpful.
Resources
The following links are the only and best "plans" for the hand baler that I can find.
A Low-Cost Pine Straw Box Baler from the North Carolina Forest Service.
Pine Straw Baler #1 and Pine Straw Baler plans #2 from the LSU College of Agriculture.
Here's a video showing how to use the hand baler.
Directions to build a hand-powered leaf and hay baler. While this one is a different type - horizontal rather than vertical - the principle is the same, and some might appreciate the step-by-step building instructions included with this one.

Comments have been disabled due to the high amount of spam received. I apologize for any inconvenience that may cause. You are welcome to contact me by email.
~~~~~
Instagram | Facebook | Pinterest | Subscribe


